

Loaded Cheeseburger Biscuit Bombs: A Flavor-Packed Treat
If you’re looking for a fun, tasty, and easily shareable meal option, look no further than Loaded Cheeseburger Biscuit Bombs. These delightful treats are the perfect combination of convenience and flavor, making them an ideal choice for family dinners, parties, or game day gatherings. Imagine biting into a warm, flaky biscuit that encases a hearty filling of seasoned ground beef, melty cheese, and classic burger toppings. It’s an all-in-one dish that brings the beloved flavors of a cheeseburger into a portable format.
The appeal of Loaded Cheeseburger Biscuit Bombs lies not only in their delicious taste but also in their simplicity. Using refrigerated biscuit dough as the base, this recipe allows even novice cooks to create an impressive dish in no time. The combination of savory meat, gooey cheese, and tangy condiments wrapped in a soft biscuit makes for a satisfying meal that’s sure to please both kids and adults alike. Whether you’re hosting a casual get-together or simply craving a comforting meal, these biscuit bombs are sure to be a hit.
Understanding the Ingredients
Before diving into the preparation of Loaded Cheeseburger Biscuit Bombs, it’s essential to familiarize yourself with the key ingredients that contribute to their mouthwatering flavor.
1. Refrigerated Biscuit Dough: The star of this recipe, refrigerated biscuit dough offers convenience and ease of use. It eliminates the need for time-consuming dough preparation, making it accessible for busy weeknight meals. The biscuits bake up light and fluffy, providing the perfect outer layer for the savory filling.
2. Ground Beef: Quality ground beef is crucial for achieving a flavorful and satisfying filling. Opt for a blend with a bit of fat content, such as 80/20 ground beef, to ensure the meat stays juicy during cooking. The seasoning of the beef is also vital; it brings the classic cheeseburger flavor to life, ensuring that each bite is packed with taste.
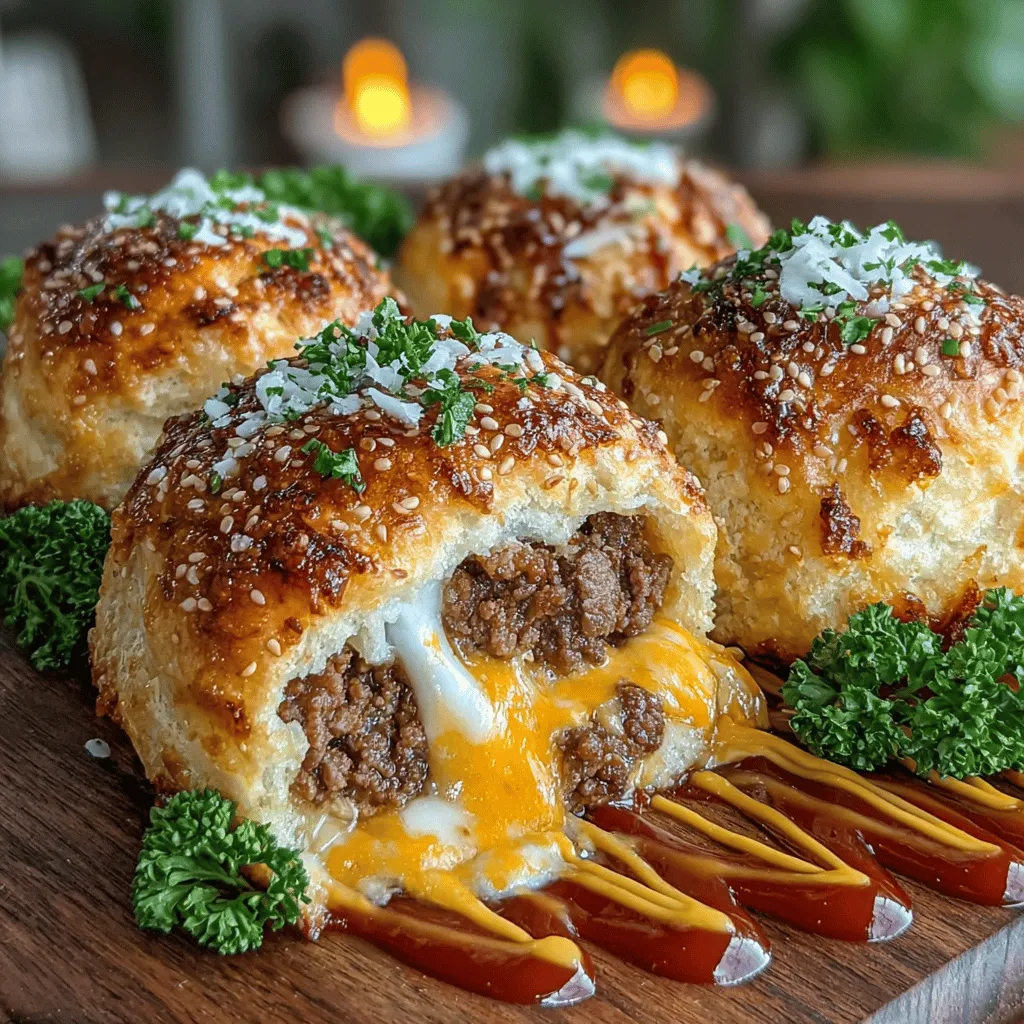
3. Cheddar Cheese: No cheeseburger is complete without cheese, and for this recipe, shredded cheddar cheese is the go-to choice. Its sharp flavor and excellent melting properties make it an ideal addition to the filling. While cheddar is a classic option, feel free to experiment with other types of cheese, such as Monterey Jack or pepper jack, for added flavor variation.
4. Pickles and Onions: These ingredients add an essential crunch and tang to the filling, evoking the classic cheeseburger experience. Diced pickles provide a zesty bite, while finely chopped onions lend a subtle sweetness and depth of flavor. Together, they elevate the overall taste profile of the biscuit bombs.
5. Ketchup and Mustard: These iconic condiments are staples in the cheeseburger world, and they play a vital role in enhancing the overall flavor of the filling. A drizzle of ketchup adds sweetness, while mustard contributes a tangy kick that perfectly balances the richness of the meat and cheese.
6. Importance of Seasoning: To elevate the flavor of the filling, seasoning is key. A blend of garlic powder, onion powder, salt, and pepper not only enhances the taste of the ground beef but also ensures that every bite is flavorful. Proper seasoning is essential for transforming simple ingredients into a mouthwatering dish.
Preparation Steps Explained
With a solid understanding of the ingredients, it’s time to dive into the preparation of Loaded Cheeseburger Biscuit Bombs. The process is straightforward and requires only a few essential steps.
1. Preheat the Oven and Prepare the Baking Sheet: Begin by preheating your oven to 375°F (190°C). While the oven is warming up, line a baking sheet with parchment paper or a silicone baking mat. This will prevent the biscuit bombs from sticking and make for easy cleanup.
2. Cooking the Ground Beef: In a large skillet over medium heat, add the ground beef. Use a wooden spoon or spatula to break the meat apart as it cooks. It’s essential to brown the meat evenly for optimal flavor. Continue cooking until the beef is fully browned and no longer pink, typically about 7-10 minutes. Once cooked, drain any excess fat from the skillet to prevent the filling from becoming greasy.
3. Creating the Filling: Now that your beef is ready, it’s time to mix in the other ingredients to create the flavorful filling. In the same skillet, lower the heat and add the diced onions and pickles to the browned beef, stirring to combine. Let them heat through for a couple of minutes until the onions are translucent. Then, remove the skillet from the heat and stir in the shredded cheddar cheese, ketchup, and mustard. Mix everything thoroughly, ensuring that the cheese begins to melt and binds the filling together. Taste the mixture and adjust the seasoning with salt and pepper as needed.
As you prepare the filling, the aroma of the seasoned beef, melted cheese, and tangy condiments will awaken your senses and set the stage for a delicious meal. The filling should be hearty yet easy to work with, ensuring that each biscuit bomb is packed with flavor.
With the filling ready and the oven preheated, you are well on your way to creating these Loaded Cheeseburger Biscuit Bombs. The next steps will guide you through assembling and baking these delectable treats, bringing the flavors of a classic cheeseburger into a convenient, bite-sized form. Stay tuned for the continuation of this recipe, where we’ll explore the final steps to make your biscuit bombs a reality.
Shaping the Biscuit Bombs
Shaping your Loaded Cheeseburger Biscuit Bombs is a crucial step that will determine how well they hold together and how tasty they will be. Here are some techniques to effectively flatten and seal the dough.
Techniques for Flattening and Sealing Dough
1. Prepare the Dough: Start with your biscuit dough, either homemade or store-bought. Make sure it’s chilled for easier handling.
2. Divide the Dough: Roll the dough into a log and cut it into even pieces, about 2-3 inches each. This ensures uniformity in size, which leads to even cooking.
3. Flatten the Dough: Using a rolling pin or your hands, flatten each piece into a disk about ¼ inch thick. Aim for a size large enough to encase your filling comfortably (about 4-5 inches in diameter).
4. Add the Filling: Place a spoonful of cooled filling (ground beef, cheese, and any additional toppings) in the center of each dough disk.
5. Seal the Bombs: Gather the edges of the dough disk and pinch them together to enclose the filling completely. Make sure to seal it tightly to prevent any filling from leaking during baking. You can also roll the bomb gently in your hands to create a smooth ball.
Importance of Letting the Filling Cool Slightly Before Assembly
Allowing the filling to cool slightly before assembling your biscuit bombs is essential. If the filling is too hot, it can make the dough too sticky, making it difficult to handle. Additionally, hot filling can cause the biscuit bombs to puff up too quickly in the oven, leading to an uneven texture. Aim for a filling temperature that is warm but not hot, allowing for easier assembly.
Baking the Biscuit Bombs
Once your biscuit bombs are shaped and sealed, it’s time to bake them to perfection.
Instructions on Baking
1. Preheat the Oven: Preheat your oven to 375°F (190°C). A well-heated oven ensures that the biscuit bombs cook evenly and achieve that perfect golden-brown exterior.
2. Prepare the Baking Sheet: Line a baking sheet with parchment paper or lightly grease it to prevent sticking. This will also help with easy cleanup.
3. Arrange the Bombs: Place the shaped biscuit bombs on the baking sheet, leaving enough space between each one to allow for expansion. This spacing helps them bake evenly.
4. Bake: Place the baking sheet in the preheated oven and bake for 15-20 minutes, or until the bombs are golden brown and puffed.
Visual Cues for Knowing When the Biscuit Bombs Are Done
As your Loaded Cheeseburger Biscuit Bombs bake, keep an eye out for these visual cues:
– Color: The tops should be a rich golden brown.
– Puffiness: The biscuit bombs should look puffed and slightly larger than their original shape.
– Firmness: Gently tap the tops; they should feel firm to the touch, indicating they’re fully cooked.
Discussion on the Texture
When you take a bite into a Loaded Cheeseburger Biscuit Bomb, you can expect a delightful contrast of textures. The outer layer should be flaky and slightly crispy, while the inside remains soft and gooey from the melted cheese and savory ground beef. Each bite is a comforting explosion of flavors reminiscent of your favorite cheeseburger.
Serving Suggestions
Once your Loaded Cheeseburger Biscuit Bombs are baked to perfection, it’s time to think about how to serve them.
Ideas for Dipping Sauces
These biscuit bombs are perfect as finger food and pair well with a variety of dipping sauces, enhancing their flavor profile. Consider these classic choices:
– Ranch Dressing: Creamy with a hint of herbs, ranch dressing complements the savory flavors of the bombs.
– BBQ Sauce: Sweet and tangy, BBQ sauce adds a delightful zing that pairs wonderfully with the cheeseburger filling.
– Extra Ketchup or Mustard: For those who love the classic burger taste, providing ketchup and mustard is a must.
Suggestions for Side Dishes
To round out your meal, consider serving these biscuit bombs with side dishes that complement their flavor and texture. Here are some ideas:
– Salads: A fresh green salad with a zesty vinaigrette can balance the richness of the biscuit bombs.
– Fries: Crispy French fries or sweet potato fries are a classic pairing that adds crunch and satisfaction to the meal.
Presentation Tips
When serving at parties or family gatherings, presentation matters. Here are some tips to make your Loaded Cheeseburger Biscuit Bombs visually appealing:
– Platter: Arrange the biscuit bombs on a large platter with a few dipping sauces in the center.
– Garnish: Add fresh herbs like parsley or chives around the edges of the platter for a pop of color.
– Labels: If you’re offering multiple sauces, consider labeling them for easy identification.
Nutritional Information
Understanding the nutritional value of your Loaded Cheeseburger Biscuit Bombs can help you enjoy these treats mindfully.
Overview of Nutritional Value
A typical biscuit bomb can contain around 250-300 calories, depending on the ingredients used. They provide protein from the ground beef and cheese, as well as carbohydrates from the biscuit dough.
Discussion on Portion Sizes and Calorie Count
When serving, consider that one biscuit bomb is often filling enough as an appetizer. Depending on how hungry your guests are, you might want to plan for 2-3 per person. This means that a serving of 2 biscuit bombs can range from 500-600 calories.
Alternative Ingredients for Dietary Considerations
If you’re looking to make this recipe more health-conscious or suitable for specific dietary needs, here are some alternatives:
– Lean Ground Beef: Using lean ground beef can reduce the overall fat content.
– Gluten-Free Biscuit Dough: There are various gluten-free biscuit mixes available that can work well in this recipe, making it accessible for those with gluten sensitivities.
Conclusion
Loaded Cheeseburger Biscuit Bombs are not just a meal; they are a delightful experience filled with comfort and flavor. Their versatility makes them suitable for any occasion, from casual family dinners to festive gatherings.
This recipe combines the nostalgia of a classic cheeseburger with the fun of a bite-sized treat, making it a crowd-pleaser that everyone will love. We encourage you to try this recipe for a fun cooking experience and to enjoy the comforting taste of homemade bites.
Whether you’re planning a game day snack, hosting a party, or just treating yourself to something special, these Loaded Cheeseburger Biscuit Bombs are sure to impress. Don’t forget to share these delightful treats with family and friends; they will enhance any gathering and create lasting memories around the table.