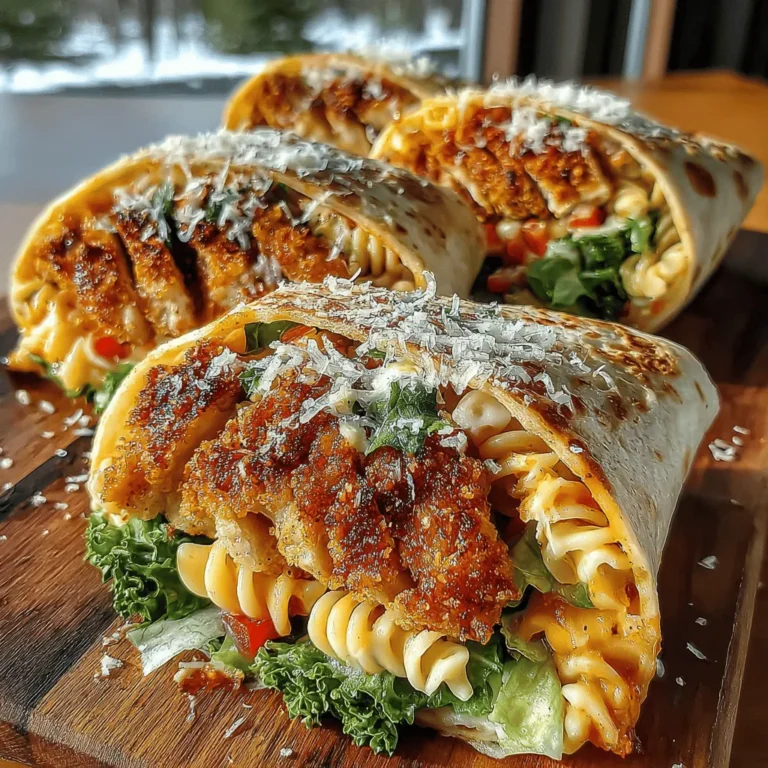
Crispy Chicken Caesar Pasta Wraps: A Flavorful Fusion Delight

WANT TO SAVE THIS RECIPE?

Crispy Chicken Caesar Pasta Wraps Recipe

Introduction

Wraps have become increasingly popular as a versatile meal option in today’s fast-paced world. They offer a convenient way to enjoy a variety of flavors and textures all in one handheld package. Among the myriad of wrap recipes available, the Crispy Chicken Caesar Pasta Wraps stand out as a delightful fusion dish that marries classic Caesar salad elements with hearty pasta and crispy chicken. This innovative recipe not only satisfies cravings but also brings a modern twist to traditional favorites, making it an exciting meal for families, busy individuals, and social gatherings alike.

Imagine the comforting familiarity of a Caesar salad, with its creamy dressing, crunchy romaine lettuce, and savory Parmesan cheese, all enveloped in a soft tortilla wrap together with al dente pasta and succulent crispy chicken. This dish is a celebration of flavors and textures that can be enjoyed for lunch, dinner, or even as a party appetizer. Whether you’re looking for a quick weeknight dinner or a dish to impress guests at your next gathering, Crispy Chicken Caesar Pasta Wraps are sure to please.

Ingredients Breakdown

Before diving into the preparation, let’s take a closer look at the key ingredients that make this dish a standout. The primary components include chicken breasts, pasta, romaine lettuce, Caesar dressing, and Parmesan cheese, all wrapped up in a tortilla. Each ingredient plays a significant role in creating a balanced and flavorful meal.

Chicken Breasts: The star of this recipe, chicken breasts are not only a lean source of protein but also incredibly versatile. When seasoned and cooked properly, they provide a juicy and flavorful base for the wraps.

Pasta: This dish typically features rotini or penne, which are ideal choices for holding onto the creamy Caesar dressing. Pasta adds heartiness to the meal, making it filling and satisfying.

Romaine Lettuce: Crisp and refreshing, romaine lettuce adds a crunchy texture that contrasts beautifully with the warm pasta and chicken. Additionally, it contributes essential vitamins and minerals to the dish.

Caesar Dressing: A key ingredient that ties all the flavors together, Caesar dressing provides the rich, creamy element that is characteristic of a traditional Caesar salad. You can use store-bought dressing for convenience or make your own for a fresher taste.

Parmesan Cheese: This sharp, nutty cheese enhances the flavor profile of the wraps. Shredded or shaved, Parmesan adds a touch of luxury and creaminess that complements the other ingredients.

Tortillas: The final touch, tortillas serve as the perfect vessel for holding all the delicious components together. You can choose between flour or whole wheat tortillas based on your preference.

Not only do these ingredients come together to create a mouthwatering meal, but they also offer nutritional benefits. For instance, romaine lettuce is low in calories and high in fiber, while Parmesan cheese is a good source of calcium. When combined, these ingredients make for a well-rounded dish that is both indulgent and nourishing.

Preparation of the Chicken

Now that we have an understanding of the ingredients, it’s time to focus on preparing the chicken, which is crucial for the overall success of the Crispy Chicken Caesar Pasta Wraps. The first step is to season the chicken breasts properly. A simple blend of salt, pepper, garlic powder, and Italian seasoning works wonders in enhancing the flavor. Rub the seasoning mixture generously over the chicken to ensure that every bite bursts with flavor.

Next, choose your cooking method. For a crispy exterior and juicy interior, pan-searing is an excellent choice. Heat a tablespoon of olive oil in a skillet over medium-high heat. Once the oil is hot, carefully place the seasoned chicken breasts in the skillet. It’s important not to overcrowd the pan, as this can cause the chicken to steam rather than sear. Cook the chicken for about 6-7 minutes on each side, or until it reaches an internal temperature of 165°F. The goal here is to achieve a beautiful golden brown finish that promises a satisfying crunch when you bite into the wraps.

After cooking, don’t rush to slice the chicken immediately. Letting the chicken rest for about 5 minutes will allow the juices to redistribute, ensuring that the meat remains tender and moist. This simple step is often overlooked but is crucial for achieving the best texture and flavor in your finished dish.

Crisping the Chicken

To elevate the chicken’s texture and flavor, we will coat it with breadcrumbs. This step is where you can really take your Crispy Chicken Caesar Pasta Wraps to the next level. For an extra crunch, use panko breadcrumbs instead of traditional breadcrumbs. Panko is lighter and airier, which results in a crispier coating when cooked.

To prepare the breadcrumb coating, set up a dredging station with three shallow dishes: one for flour, one for beaten eggs, and one for the panko breadcrumbs. Dip each seasoned chicken breast first into the flour, shaking off any excess, followed by the egg, and finally, coat it thoroughly with panko breadcrumbs.

When cooking the coated chicken, you can opt for either pan-frying or baking. If you choose to pan-fry, add just enough oil to the skillet to cover the bottom and heat it over medium heat. Cook the chicken for about 4-5 minutes on each side, or until the breadcrumbs turn a deep golden brown. If you prefer a healthier approach, baking is an excellent alternative. Preheat your oven to 400°F and place the coated chicken breasts on a baking sheet lined with parchment paper. Bake for 20-25 minutes, flipping halfway through, until the chicken is crispy and cooked through.

Regardless of the method you choose, keep an eye on the chicken as it cooks. Visual cues such as a deep golden color and a crunchy texture will indicate that your chicken is perfectly crisped.

Tossing the Pasta

With the chicken prepped and crisped to perfection, it’s time to bring all the elements together by preparing the pasta. Begin by cooking your choice of pasta according to the package instructions, making sure to drain it well once cooked. While the pasta is still warm, combine it in a large mixing bowl with the Caesar dressing, allowing the warm pasta to soak up the flavors of the dressing.

Next, add in the chopped romaine lettuce and shredded Parmesan cheese. This is also the stage where you can get creative with your Crispy Chicken Caesar Pasta Wraps. Consider adding additional ingredients such as cherry tomatoes, sliced cucumbers, or even avocado to enhance the freshness of the dish. For those who enjoy different flavor profiles, experimenting with various cheeses—like feta or mozzarella—can add an exciting twist to your wraps.

Once everything is combined, give it a gentle toss to ensure that the pasta, lettuce, and chicken are evenly coated with the creamy dressing. The result should be a colorful medley of flavors and textures, ready to be wrapped up in tortillas for a satisfying meal.

Stay tuned for the next part of the article, where we will guide you through the wrapping process, serving suggestions, and tips on how to make this dish your own.
<strong>Introduction</strong>” /></p>
</p>
<h2>Importance of Evenly Coating the Pasta for Maximum Flavor</h2>
</p>
<p>When preparing your Crispy Chicken Caesar Pasta Wraps, one critical step is ensuring that each strand of pasta is evenly coated with the Caesar dressing. This not only enhances the overall flavor but also ensures that every bite of your wrap is as delicious as the last. Begin by adding your cooked pasta to a large mixing bowl. Pour in the Caesar dressing gradually, tossing the pasta gently with a spatula or your hands. Make sure that every piece is covered, as this will contribute to the creamy texture and tangy flavor profile that defines a classic Caesar salad.</p>
</p>
<p>To maximize flavor retention, consider letting the pasta sit for a few minutes after coating. This allows the dressing to penetrate the pasta strands, ensuring that each bite is filled with zesty goodness. Additionally, using a high-quality Caesar dressing will significantly elevate the taste of your wraps, making the effort well worth it.</p>
</p>
<h2>Assembling the Wraps</h2>
</p>
<h3>Step-by-Step Guide to Layering the Pasta Mixture and Crispy Chicken in Tortillas</h3>
</p>
<p>Once your pasta is perfectly coated and your crispy chicken is ready, it’s time to assemble your wraps. Start by laying a tortilla flat on a clean surface or a cutting board. Place a generous scoop of the Caesar pasta mixture in the center of the tortilla, leaving enough space around the edges for folding. Then, add a few pieces of the crispy chicken on top of the pasta. The combination of the creamy pasta and crunchy chicken is what makes these wraps irresistible.</p>
</p>
<h3>Tips for Rolling Wraps Tightly to Prevent Filling from Spilling Out</h3>
</p>
<p>To ensure your wraps are tightly rolled and the filling doesn’t spill out, follow these simple steps:</p>
</p>
<p>1. <strong>Fold the sides</strong>: Begin by folding in the sides of the tortilla over the filling. This will help contain everything inside as you roll.</p>
<p>2. <strong>Roll from the bottom</strong>: Starting from the bottom (the part closest to you), begin rolling the tortilla up and over the filling. Keep the roll tight but not so tight that it tears the tortilla.</p>
<p>3. <strong>Tuck and roll</strong>: As you roll, tuck the filling in gently, making sure it stays contained. Continue rolling until you reach the top of the tortilla.</p>
</p>
<p>If your tortillas are prone to tearing, consider warming them slightly in the microwave for 10-15 seconds. This will make them more pliable and easier to roll.</p>
</p>
<h3>Suggestions for Tortilla Types and Their Impact on Flavor and Presentation</h3>
</p>
<p>The type of tortilla you choose can significantly impact the flavor and presentation of your wraps. Here are some options to consider:</p>
</p>
<p>– <strong>Flour Tortillas</strong>: Soft and pliable, flour tortillas are the most common choice for wraps. They provide a neutral flavor that allows the filling to shine.</p>
<p>– <strong>Whole Wheat Tortillas</strong>: For a healthier twist, whole wheat tortillas add a nutty flavor and extra fiber.</p>
<p>– <strong>Spinach or Tomato Basil Tortillas</strong>: These colorful options not only enhance the visual appeal but also add a subtle flavor that complements the Caesar dressing beautifully.</p>
<p>– <strong>Corn Tortillas</strong>: If you prefer a gluten-free option, corn tortillas bring a unique texture and taste, though they may require careful handling to avoid cracking.</p>
</p>
<p>Experimenting with different tortilla types can make your Crispy Chicken Caesar Pasta Wraps visually appealing and add an unexpected flavor twist.</p>
</p>
<h2>Final Toast for Extra Crispiness</h2>
</p>
<h3>Explanation of the Optional Final Toasting Step and Its Benefits</h3>
</p>
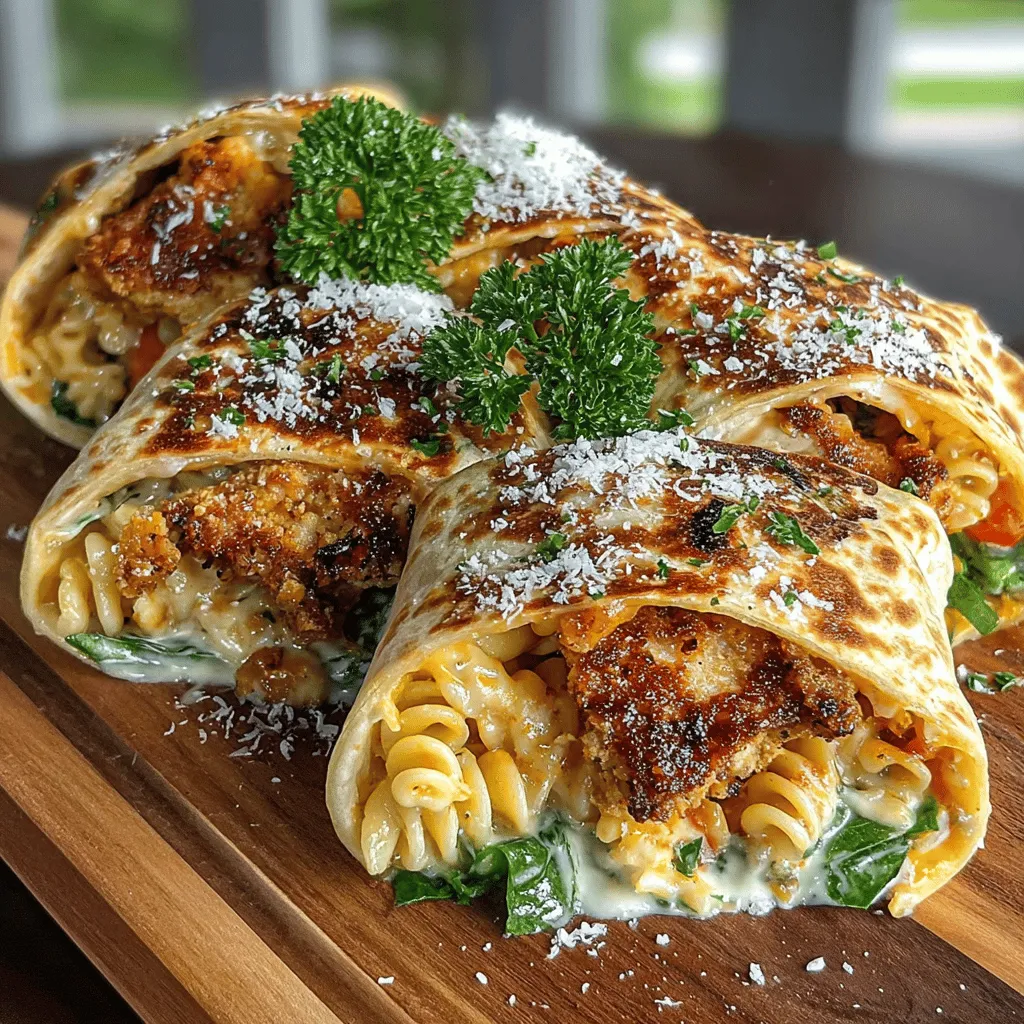
<p>While your wraps are delicious as is, an optional final toasting step can take them to the next level. By toasting the assembled wraps in a skillet or on a griddle, you create a warm, crispy exterior that enhances the overall texture. This step adds a delightful crunch that contrasts beautifully with the creamy pasta and chicken filling, elevating the enjoyment of each bite.</p>
</p>
<h3>Tips for Achieving the Perfect Golden Brown Wrap Without Burning</h3>
</p>
<p>To achieve the perfect golden brown wrap, follow these tips:</p>
</p>
<p>1. <strong>Preheat the Skillet</strong>: Heat a non-stick skillet over medium heat. Allow it to reach the right temperature before adding the wraps.</p>
<p>2. <strong>Add a Small Amount of Oil</strong>: Lightly coat the skillet with a small amount of cooking oil or butter. This will help the wraps crisp up without sticking.</p>
<p>3. <strong>Toast in Batches</strong>: Depending on the size of your skillet, toast one or two wraps at a time to ensure they don’t overcrowd the pan. This allows for even toasting.</p>
<p>4. <strong>Monitor Closely</strong>: Keep an eye on the wraps as they toast. After about 2-3 minutes, use tongs to flip them over and toast the other side until golden brown.</p>
</p>
<p>By following these steps, you’ll achieve a perfectly toasted wrap that combines warm, crispy exteriors with a creamy filling.</p>
</p>
<h3>Discussion on the Texture Contrast Between the Warm, Crispy Outside and the Creamy Filling</h3>
</p>
<p>The contrast between the warm, crispy exterior and the creamy filling is one of the defining features of Crispy Chicken Caesar Pasta Wraps. The satisfying crunch of the toasted tortilla adds a layer of texture that complements the tender pasta and succulent chicken. This delightful interplay of textures not only makes each bite interesting but also enhances the overall eating experience. By toasting your wraps, you elevate them from a simple meal to a gourmet delight, perfect for special occasions or a cozy dinner at home.</p>
</p>
<h2>Serving Suggestions</h2>
</p>
<h3>Ideas for Side Dishes That Pair Well with Crispy Chicken Caesar Pasta Wraps</h3>
</p>
<p>To create a well-rounded meal, consider pairing your Crispy Chicken Caesar Pasta Wraps with complementary side dishes. Here are some ideas:</p>
</p>
<p>– <strong>Caesar Salad</strong>: Stick with the theme by serving a classic Caesar salad on the side. The freshness of the greens will balance the richness of the wraps.</p>
<p>– <strong>Vegetable Chips</strong>: For a crunchy side, opt for baked vegetable chips. They provide a healthy alternative to traditional potato chips and add color to your plate.</p>
<p>– <strong>Fruit Salad</strong>: A refreshing fruit salad can contrast the savory flavors of the wraps. Choose a mix of seasonal fruits for brightness and sweetness.</p>
<p>– <strong>Roasted Vegetables</strong>: Roasted seasonal vegetables seasoned with herbs make a nutritious and flavorful accompaniment.</p>
</p>
<h3>Presentation Tips for an Attractive Serving Platter</h3>
</p>
<p>When it comes to serving your wraps, presentation matters. Here are a few tips to make your platter stand out:</p>
</p>
<p>– <strong>Arrange Neatly</strong>: Place the wraps on a large serving platter, arranging them in a circular or fan shape for visual appeal.</p>
<p>– <strong>Garnish</strong>: Add fresh herbs, such as parsley or basil, around the edges of the platter for a pop of color.</p>
<p>– <strong>Serve with Dips</strong>: Include small bowls of dips or sauces on the platter. This not only enhances the visual aspect but also offers guests a choice to customize their flavors.</p>
</p>
<h3>Suggestions for Dips or Sauces That Enhance the Flavor Experience</h3>
</p>
<p>Enhance the flavor experience of your wraps by serving them with dips or sauces. Consider these options:</p>
</p>
<p>– <strong>Extra Caesar Dressing</strong>: A small bowl of Caesar dressing for dipping allows guests to enjoy additional creamy flavor.</p>
<p>– <strong>Ranch Dressing</strong>: A classic choice, ranch dressing pairs well with the savory components of the wraps.</p>
<p>– <strong>Spicy Aioli</strong>: For a kick, serve a spicy aioli made from mayonnaise, garlic, and hot sauce to complement the crispy chicken.</p>
<p>– <strong>Salsa or Pico de Gallo</strong>: Fresh salsa or pico de gallo can provide a zesty contrast to the richness of the wraps.</p>
</p>
<h2>Nutritional Information</h2>
</p>
<h3>Overview of the Nutritional Benefits of the Meal per Serving</h3>
</p>
<p>Crispy Chicken Caesar Pasta Wraps offer a balanced blend of nutrients, making them a satisfying meal option. Here’s a breakdown of the nutritional benefits per serving (based on typical ingredients):</p>
</p>
<p>– <strong>Protein</strong>: The crispy chicken provides a hearty protein source, essential for muscle repair and growth.</p>
<p>– <strong>Carbohydrates</strong>: The pasta serves as a source of complex carbohydrates, providing energy for your day.</p>
<p>– <strong>Vitamins and Minerals</strong>: The addition of romaine lettuce and any vegetables enhances the meal’s vitamin and mineral content, particularly vitamins A and C.</p>
</p>
<h3>Discussion on How This Recipe Fits into a Balanced Diet</h3>
</p>
<p>This recipe can fit well into a balanced diet when enjoyed in moderation. The combination of protein, carbohydrates, and healthy fats (from the dressing) makes it a wholesome meal. To keep it balanced, consider adjusting portion sizes based on your dietary needs and adding a side of vegetables or a fresh salad to increase fiber intake.</p>
</p>
<h3>Insights into Possible Substitutions for Dietary Restrictions (Gluten-Free, Vegetarian Options)</h3>
</p>
<p>For those with dietary restrictions, here are some substitutions to consider:</p>
</p>
<p>– <strong>Gluten-Free</strong>: Use gluten-free pasta and tortillas to make this dish suitable for gluten-sensitive individuals.</p>
<p>– <strong>Vegetarian Option</strong>: Replace the crispy chicken with grilled tofu or chickpeas for a protein-rich vegetarian alternative. You could also use a plant-based Caesar dressing for a vegan version.</p>
<p>– <strong>Low-Carb</strong>: Substitute traditional pasta with zucchini noodles or spaghetti squash for a low-carb version that maintains the delicious flavors of the dish.</p>
</p>
<h2>Conclusion</h2>
</p>
<p>Crispy Chicken Caesar Pasta Wraps are not only a delicious and easy-to-make recipe but also a creative twist on a classic dish. The combination of crispy chicken, creamy pasta, and fresh ingredients wrapped in a warm tortilla makes for a satisfying meal that everyone will love. Whether you’re serving them for a casual family dinner or a fun gathering with friends, this recipe is sure to impress.</p>
</p>
<p>We encourage you to try this delightful fusion of flavors and textures. Share this recipe with others who might enjoy a fresh take on traditional Caesar salads and wraps. Enjoy the process of making and savoring these Crispy Chicken Caesar Pasta Wraps, and watch as they become a favorite in your household!</p>
</div>

Introduction

Crispy Chicken Caesar Pasta Wraps

Discover a delicious twist on a classic favorite with Crispy Chicken Caesar Pasta Wraps. This innovative recipe combines golden, crispy chicken, creamy Caesar dressing, and hearty pasta, all wrapped in a soft tortilla. Perfect for lunch, dinner, or a party appetizer, these wraps offer a delightful fusion of flavors and textures. Packed with savory ingredients like romaine lettuce and Parmesan cheese, they are both satisfying and nourishing. Get ready to impress your family and friends with this easy-to-make dish!

Ingredients
  

2 cups cooked pasta (like rotini or penne)

1 lb boneless, skinless chicken breasts

1 cup Caesar dressing

1 cup romaine lettuce, chopped

1/2 cup grated Parmesan cheese

1 cup breadcrumbs (panko for extra crisp)

1 teaspoon garlic powder

1 teaspoon onion powder

Salt and pepper to taste

4 large tortillas (flour or spinach)

Olive oil for cooking

Instructions
 

Prepare the Chicken: Season the chicken breasts with salt, pepper, garlic powder, and onion powder. Heat a skillet over medium-high heat with a splash of olive oil. Cook chicken for 6-7 minutes on each side, or until golden brown and cooked through. Let it cool slightly before slicing into strips.

    Crisp the Chicken: On a plate, combine the breadcrumbs with a pinch of salt and pepper. Dredge the sliced chicken strips through the breadcrumbs to coat them well. In the skillet, add a bit more olive oil and fry the breaded chicken for about 2-3 minutes on each side until crispy. Remove and place on a paper towel to absorb excess oil.

      Toss the Pasta: In a large bowl, combine the cooked pasta with Caesar dressing, chopped romaine lettuce, and grated Parmesan cheese. Toss well to ensure everything is evenly coated.

        Assemble the Wraps: Lay out the tortillas and evenly distribute the pasta mixture among them. Top with the crispy chicken strips. Roll the tortillas tightly to create wraps, tucking in the sides as you go.

          Final Toast (Optional): If desired, place the wraps seam side down in the skillet over medium heat for 2-3 minutes, until they are golden brown and warm through. This step adds an extra bit of crispiness to the wraps!

            Slice and Serve: Cut the wraps in half diagonally and serve with a drizzle of extra Caesar dressing for dipping.

              Prep Time: 20 minutes | Total Time: 40 minutes | Servings: 4 wraps

                WANT TO SAVE THIS RECIPE?

                Leave a Comment

                Recipe Rating